Looking for great (and free!) screen recorders for Mac? You couldn’t find a better place! Here, we will review some great screen recorders that will be a great option for you!
Contents
Monosnap
Monosnap is a software created to design an easier process to work remotely, by sharing videos or screenshots of your own screen, being able to communicate in a faster and efficient way.
These are the steps to follow to record your screen:
- Once you’ve dowloaded Monosnap, launched it in your Mac
- Open the Monosnap’s bar menu and click “Record video”
- Choose the capture area and hit “Start recording”
- You have available two buttons depending of what you want to do, Record button to finish, Pause/resume button to stop and resume anytime.
- Once you’ve finished recording, a preview video will appear, and Monosnap offers interesting features for the recorded video, like renaming, selecting file format, saving or sharing the video or trim the final video.
QuickTime Player
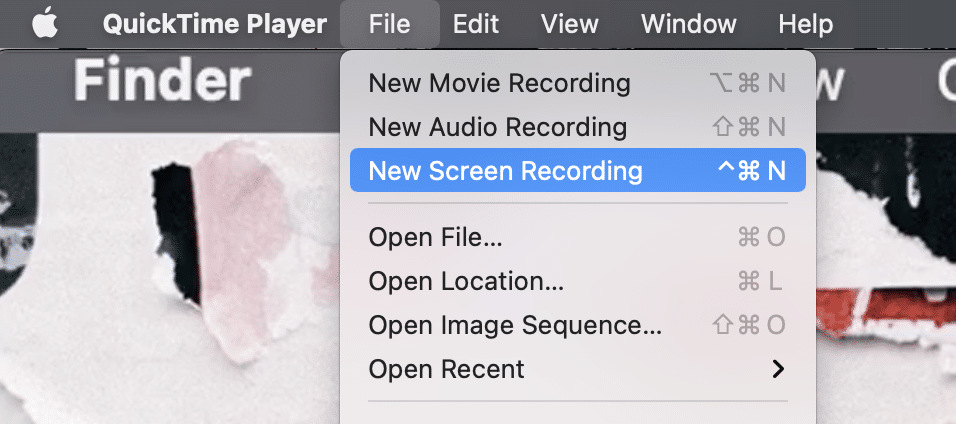
QuickTime is built-in app inside the Mac that will allow you to record your screen.
These are the steps to follow to record the screen:
- Open QuickTime player and press File>New Screen Recorder

- Hit “Record”
- Once you’re finished recording, press again the “Record” button. QuickTime will open automatically the recorded video so you can post edit, share or save it. From there, you can get the raw video and speed it up.
Apowersoft Screen Recorder
Apowersoft is a free screen recording app, available for Windows and Mac, that will enable the user to record any area of your screen.
These are the steps to follow:
- Hit “Start Recording” to activate it, while customising the recording mode and region.
- Once you’re finished recording, save the video or share it in social media.
Jing
Jing by Techsmith has become very popular for some time. This software is really easy to use, that’s why it has become so well-known.
Once downloaded, you will be able to access Jing from the sun icon that can be placed and moved anywhere on your screen. Apart of screen recording, it’s also useful to take screeenshots and make some post editing.
You must remember that Jing has a recording limit up to 5 minutes.
These are the steps to follow:
- Install Jing on your Mac from the website we included above
- Press over the “Sun” icon and click “Capture”
- Adjust the frame you want to record and then press “Capture video”.
- Once you have finished recording, hit the “Stop” button, and the video file will automatically appear in your screen for preview.
OBS
OBS is an open source program that allows to record your screen and make live streaming and is available for Windows, Mac and Linux.
This software is perfect for recording all your activity on the screen and then saving the raw video on the computer.
If you want to learn how to record your screen with OBS, check out our tutorial How to make a speedpaint.
Ice Cream Screen Recorder
Ice Cream is a really intuitive and free screen recording software, available for Windows, Mac and Linux, enabling the user to record any area of your screen or take a screenshot.
These are the steps to follow to record your screen:
- Install and download Ice Cream Recorder in your Mac
- Open the program and press “Capture video” and select the range of screen that you want to record
- Once everything is ready, click “Rec” to start recording
- You can pause and resume anytime by clicking the “Resume/Pause”buttons. Once you’re finished recording, click “Stop” and the recording process will end and your video will be saved.
- Ice Cream includes some editing features, like the trim of your final video or the instant share to Youtube or the cloud, like Google Drive or Dropbox.
Conclusion
In this post, we’ve shown you some great free screen recorders for Mac, presenting you five options to consider: Monosnap, Quicktime Player, Apowersoft, Jing, OBS and Ice Cream so we hope we’ve given you enough range of options to choose the one that better fits you!
