
Before we start
Having spent some years learning how to make a speedpaint and suffering the painful hassle of recording, editing and speeding up speedpaints, we’ve created an extremely easy to use speedpaint app anybody can use.
So here’s a tip for you: get Hustl to quickly and easily do everything that will be mentioned in this article. Hustl will automatically record and speed up the speedpaint for you in just a click. But if you want to do it manually all by yourself, we’ve made this guide to help you.
If you’ve been into digital art for a while, you’ve seen them: high-speed videos of artists painting. Timelapses that compress in just a few minutes hours and hours of drawing and painting. Yes, we’re talking about speedpaints.
Many artists, both seasoned and amateurs become captivated by the oddly mesmerizing nature of speedpainting videos. The most experienced ones already know all the tricks, but beginners wonder how to start speedpainting.
That’s why we’ve gone ahead and made this exhaustive guide that will teach step by step how to speedpaint. To make a speedpaint, first you need a drawing program, then you need to record it and finally you edit to speed it up and export it, resulting in a speedpaint video. We’ll go over each step in detail, covering different software and approaches, so you can choose the one that fits you best. We’ll explain the process step by step so you can follow without having any previous knowledge. And we’ll also propose different software alternatives, so you’ll be able to use the best speedpaint software out there, specifically suited to your needs.
This guide will be centered around explaining how to speedpaint on a computer, but nonetheless we’ll finish by talking about making speedpaints on iPad as well.
So without further ado, let’s get this going: how do you make a speedpaint?
Contents
? First things first: how to get a free drawing program
One of the most common questions we get from people that are wondering how to do a speedpaint is what drawing program to use. And that’s understandable, because without any kind of painting software you’d have nothing to record, after all ?
The most used drawing programs artists use in their speedpaint videos are Adobe Photoshop ($20.99/mo), Clip Studio Paint ($49.99) and Paint Tool SAI ($50).

We understand money is tight for an artist, so we’ve decided to include a perfectly valid free alternative: GIMP (free). GIMP can be thought of as a kind of Photoshop clone, but free and open-source (that is, developed and maintained by a community of altruistic developers). The code of the program is open and anyone can see it, so that’s a guarantee that the program has no viruses or does anything shady to your computer. It’s a pretty good program, robust and fully-featured, so it can be a good place for most artists to start. However, if you’ve tried any of the paid options, you’ll notice GIMP is not quite up to that level of quality. But one thing is for sure: it’s better than nothing.
Another good free drawing program you can download is Krita (free). It’s also free and open-source, and it’s more specifically targeted at digital art, drawing and painting than GIMP (which is more of a generalist approach to digital pictures manipulation, like Photoshop).

There’s also plenty of online speedpaint apps, but we recommend sticking with any of the programs mentioned above if you wanna be like the artists you watch and admire.
Whichever the case, getting a drawing software is just the first step. The drawing program is just so you can paint on the screen. Then we need to be able to record it and transform the recording into a speedpaint.
Okay, you have the software already installed and you’re ready to start, so now you might now be wondering how to speedpaint in Photoshop, or how to record a speedpaint on Clip Studio Paint, or how to do it in whichever app or painting software you chose.
Get ready for the action, because next up is recording your speedpaint! ?
? How to record a speedpaint
To record your art, you will need some sort of screen capturing software. The good news is there’s a huge chance that either your computer already came with one preinstalled or the one you’re most likely to need is free.
How to record speedpaints with Quicktime
[ macOS only] If you’re using an Apple computer (that is: a Mac or a Macbook), your computer came with a little program preinstalled called QuickTime.
QuickTime is what your Mac uses by default to open and reproduce all video files. When you open a .mp4 or .mov file in your Mac, the program you’re using to see that video is QuickTime.
However, that’s not all. There’s a very nifty trick almost nobody knows. What very few people know is that QuickTime can also be used to record your screen. You heard that right: it not only reproduces videos, but also records your screen.
So how can you start to record your speedpaint with QuickTime?
- Open QuickTime.
To do this, the easiest way is to press the keys
⌘ command+spacebar. A little box will open in the middle of your screen, that’s called Spotlight. Write “quicktime” and an item called “QuickTime Player.app” will show up. Click it to open QuickTime.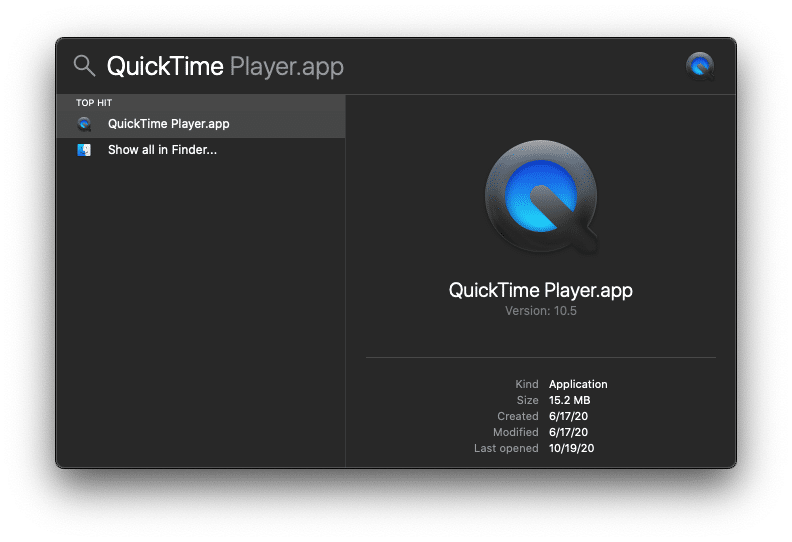
- Confirm QuickTime is opened.
QuickTime will start up. You can check it by looking at the top left corner of your screen, your Menu Bar, and seeing that in fact QuickTime Player is the current open program:

- Go to File and then click “New Screen Recording”.
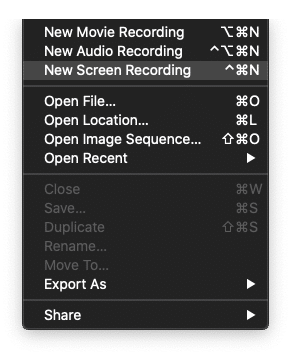
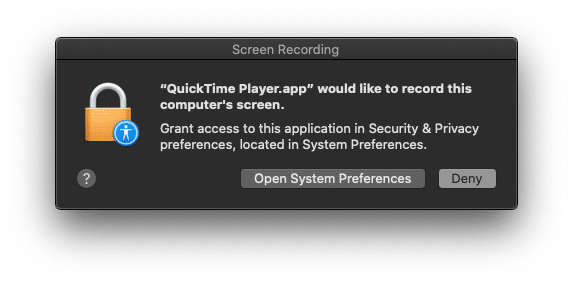
- Grant QuickTime screen recording permissions.
It may happen that QuickTime will ask you for Screen Recording permissions. You should grant the app those permissions or otherwise QuickTime will be unable to record anything and most likely all recording attempts will just record just your empty desktop. Click on “Open System Preferences”, make sure “QuickTime Player” is checked in the list of apps allowed to record your screen and quit the window or follow the steps macOS tells you to. (You may need to reopen QuickTime again).
- Select the area to record.
After clicking “New Screen Recording”, you will see a crop box with handles to define which portion of your screen you want to record (most speedpainters usually just record their drawing area). You can also choose to record your full screen. After you’re done selecting the part of your screen you want to record, look for the “Record” button that’s at the QuickTime control bar by the bottom of the screen and click it. QuickTime will start recording the selected portion of the screen.
- Get painting!
Now is the time to draw and paint everything you’d like. Rest assured QuickTime is recording everything you do. Also, you might be careful not to open any other apps so they don’t end up in the final speedpaint!
- Stop the QuickTime recording.
When you’re done painting, it’s time to stop the QuickTime recording. To do that, look in your Mac’s Menu bar at the very top of the screen for the QuickTime stop icon and click it

- Export the video.
Once you click it, QuickTime will open up a window with the video you’ve recorded, ready for you to save. So go ahead and export it! Click File -> Save… and select where you want your video to be saved!


And we’re done recording your speedpaint process with the QuickTime app! However, using QuickTime to record your speedpaint is just half the process. You now need to transform your real-time video into a speedpaint. We’ll do this by editing your video to speed it up and then export it. If you want, skip the OBS process (which will be similar to that of QuickTime) and jump over to the next section to learn how to edit a speedpaint!
How to record speedpaints with OBS
[Valid both for ⊞ Windows and macOS] If you’re using Windows, you might not have a recording program out of the box as Mac users do. But don’t worry! There’s a free and easy fix for that.
Whether you’re using Windows or macOS, you can follow this procedure. If you’re a Mac user, maybe you didn’t like QuickTime or you’re looking for an alternative to QuickTime to record your screen, so OBS might also come in handy. OBS is the acronym for Open Broadcaster Software, an app typically used by streamers (both on Twitch and YouTube) to stream their screens and webcams, but it can also record your screen without streaming.
- First, head over to the OBS download page and download OBS.
- Open it and install the program.
- Once you have it installed, open it. A screen similar to this one will show up:
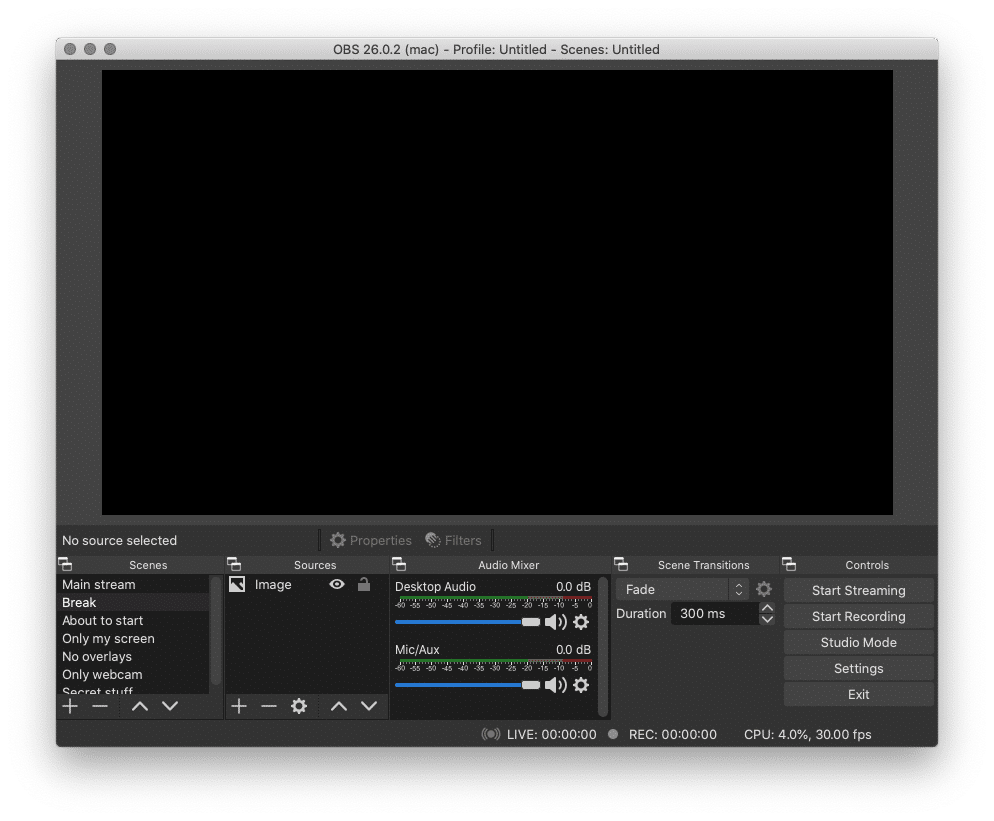
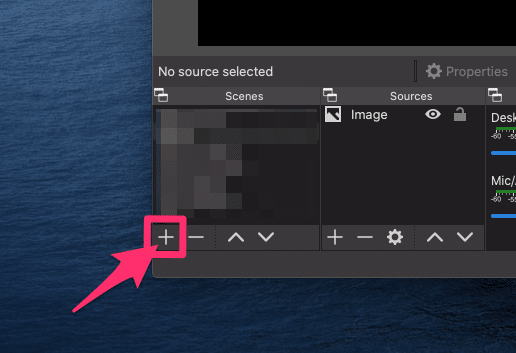
- Add a new scene. To do that, in the lower left bottom locate the “Scenes” section and click the plus (“+”) button:
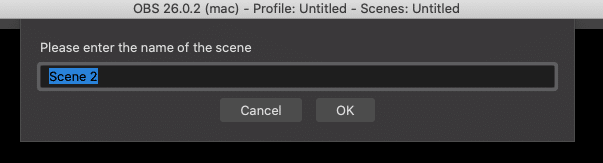
- Enter a name for your scene. It doesn’t really matter, but you can call it something like “My Screen” or “Desktop”.
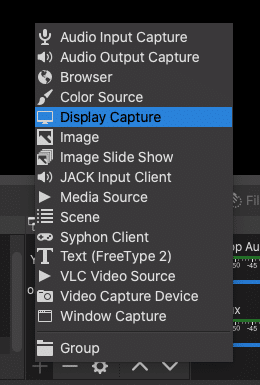
- Add a source for your scene. To do that, locate the “Sources” panel right next to “Scenes” and click the add button.
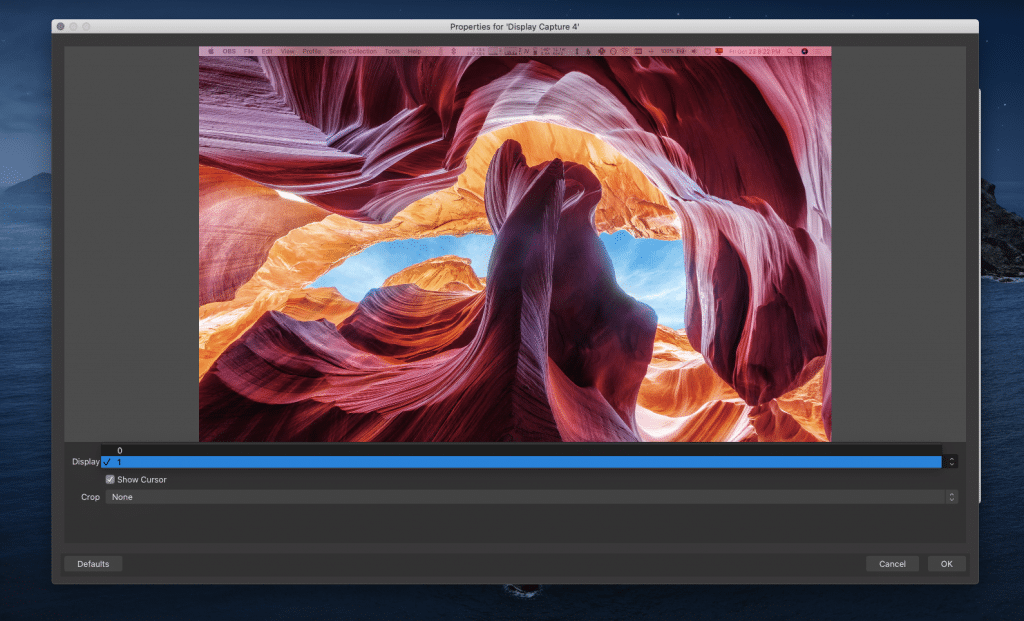
- Select a Display Capture source type
- Click “Create new” and then click “Ok” to go to the source creation window.
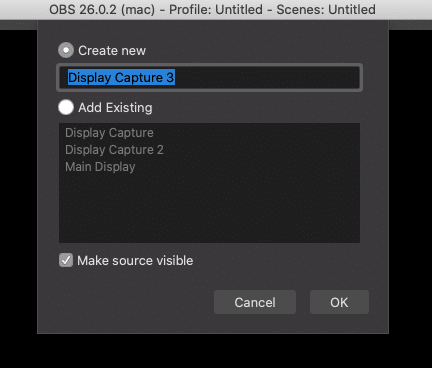
- In the lower section, select the screen you would like to record (if you have only one screen, then only one screen will be available). Also make sure to check whether you’d like the cursor to show up in the recording or not.
- We’re now ready to start recording! Click “Start Recording” in the “Controls” panel by the right of the window and OBS will start recording your screen.
- Open your drawing program and create your art! OBS is recording.
- When you want to finish, go back to OBS and click “Stop Recording”. The recorded movie will be saved to your “Downloads” folder.
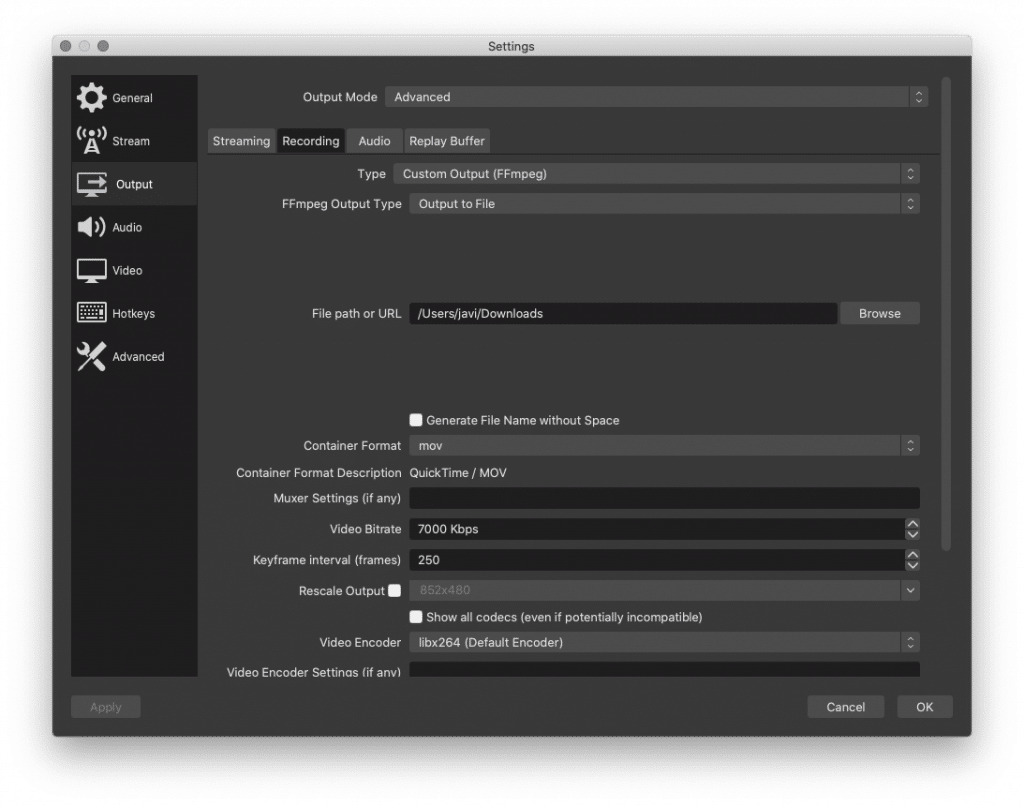
- If you want to modify the settings of the screen recording, those can be found in the Settings window. Click the “Settings” button in the “Control” panel. On the Settings window, select “Output” on the list in the left. Then, switch to the “Recording” tab on the right side of the window. And there you can choose where your recordings will be saved, the file format and a bunch of other settings.


And you’re done! That’s how you record your screen with OBS. However, as we said earlier, recording your screen is just half of the journey if you want to make a speedpaint video. Next, you’ll learn how to edit speedpaints to speed up your recording and export a final, finished speedpaint video.
? How to edit a speedpaint
If you want to learn how to record a speedpaint, capturing your screen is just half the story. Now we need to edit the recording to speed it up. So, next up, we’ll be learning how to edit speedpaints.
The first thing you’re gonna need is a video editing program.
Most professional speedpainters use Adobe Premiere Pro ($20.99/mo) to do this.
We know, that might be a steep price for a video editing software just to edit your speedpaint video so we’ll be covering how to do this using two free video editing apps: iMovie and Windows Movie Maker (Windows Photos).
How to edit a speedpaint with iMovie
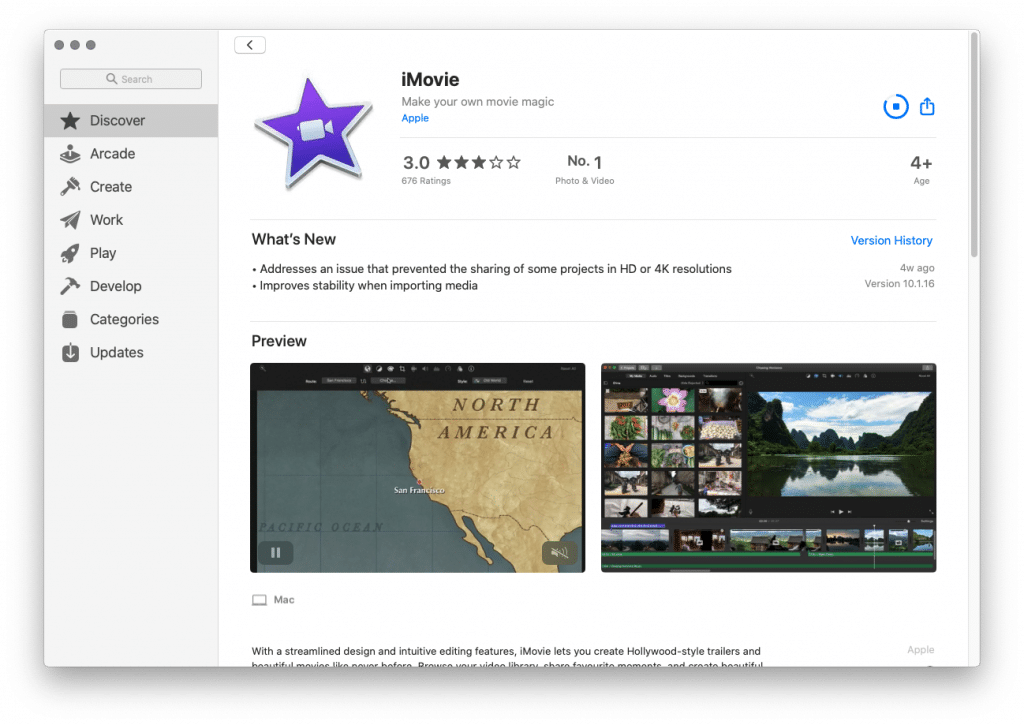
[ macOS only] If you’re using an Apple computer, you will be using a free app that comes preinstalled with your computer, or that you can download very easily and for free from the Mac App Store. This app is called iMovie and it’s a free video editing software for Mac.
- Download iMovie (if you haven’t already or if you don’t have it installed in your computer). Head over to the Mac App Store (click on the icon on the top leftmost corner of your screen and then click “App Store…”) and then search for “iMovie”. Click it to open the app page and just click “Download”.
- Once you have iMovie, open it. If you can’t find it in your Mac, press the keys
⌘ command+spacebar. In the Spotlight box that shows up, write “iMovie”. An item named “iMovie.app” will show up, just click it to open it.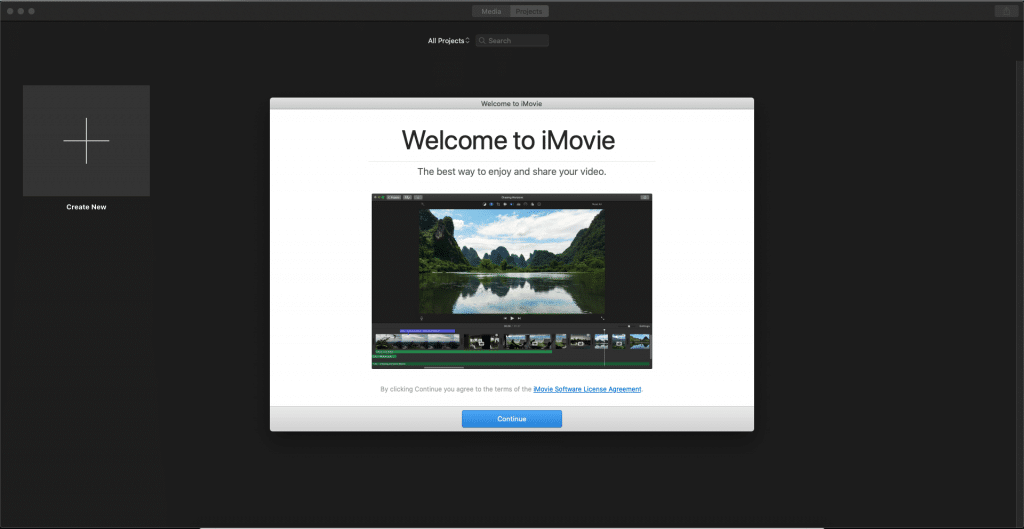
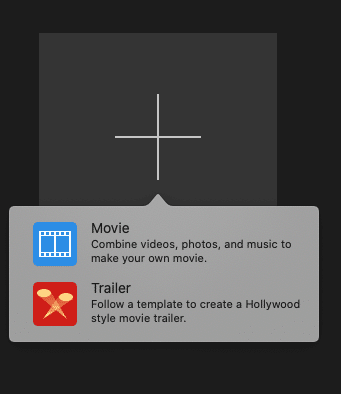
- Click on “Create New” to create a new film project
- If you get the option to choose, choose, “Movie”
- You’ll see the iMovie main interface
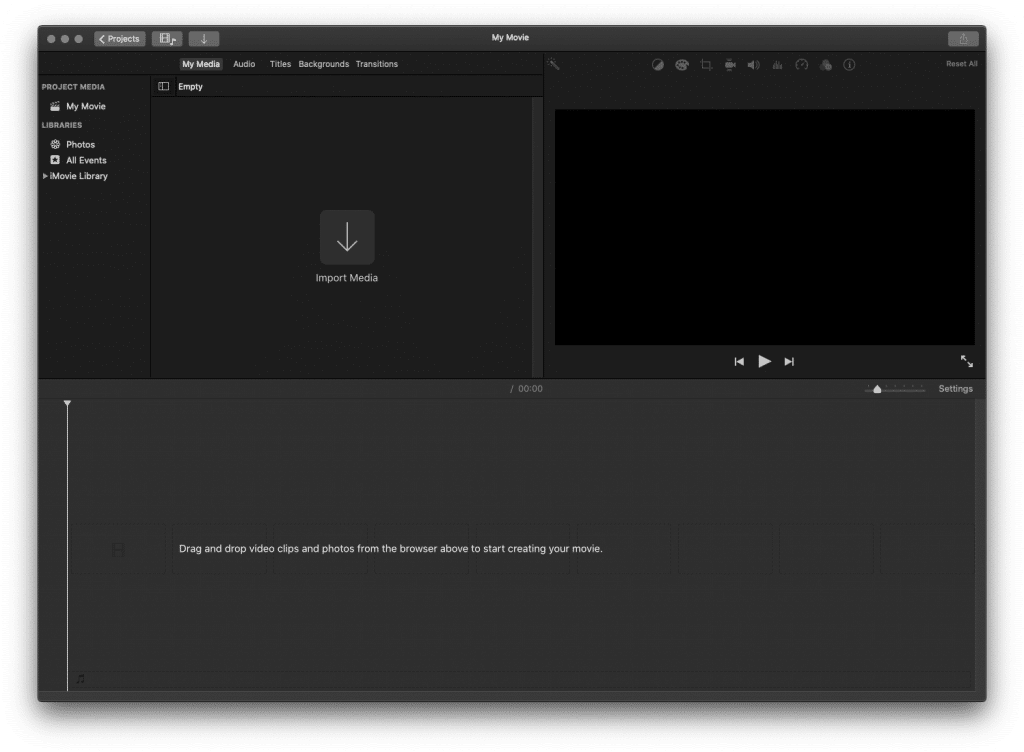
- Drag and drop the video file you recorded in the previous step anywhere into the timeline:
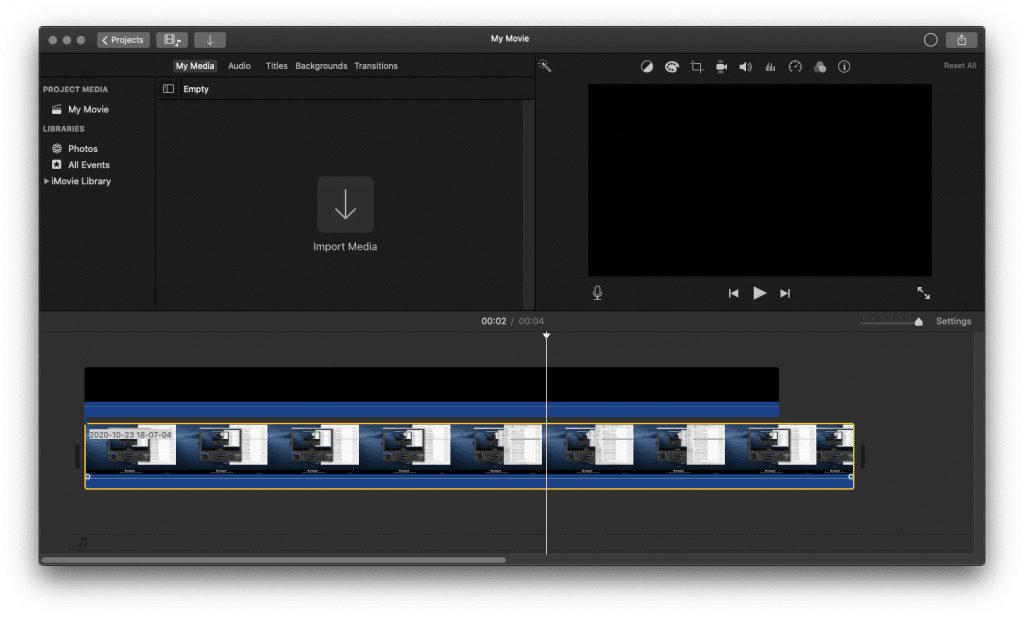
- Right click on your clip and select “Show Speed Editor”.
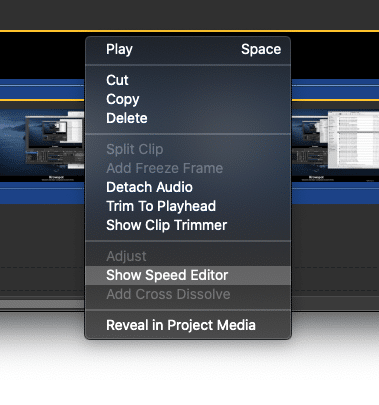
- A small circular knob will appear in the upper right corner of your clip
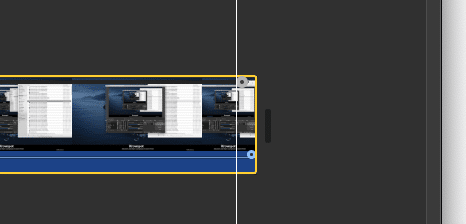
- Click and drag the speed knob all the way down to the start of the clip to compress the clip by increasing its speed. An icon of a rabbit will appear on top of the clip, indicating the clip has been sped up.

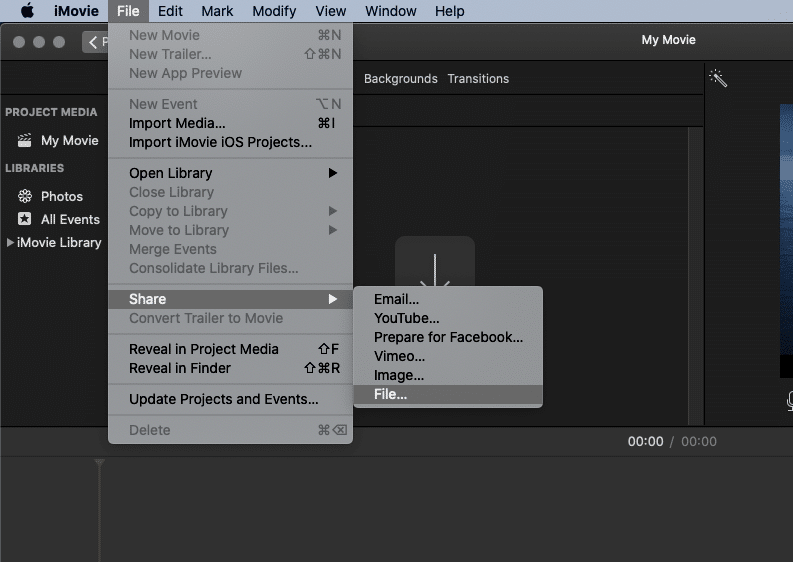
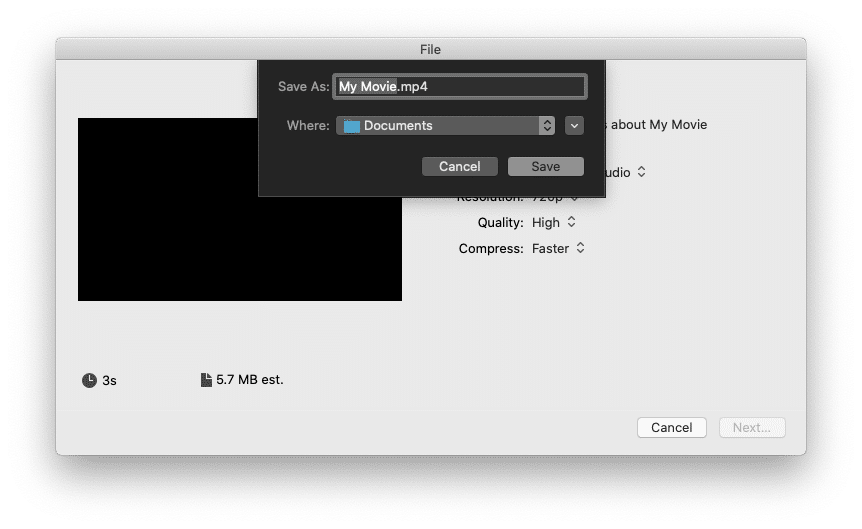
- Once you’re happy with the final speed, export the final speedpaint video by going to File ▸ Share ▸ File… and selecting the location where you’d like to save your speedpainting.


Congratulations! You’ve successfully created your first speedpaint! It was quite a ride, huh?
Keep reading if you want how to add music to your speedpaint video… or jump to the secret method that does all of this automatically!
How to edit a speedpaint with Windows Movie Maker (Windows Photos App)
[⊞ Windows only] If you’re using Windows, you also have a free video editing program.
In old versions of Windows, this program was called Windows Movie Maker, but since Windows 10 it’s no longer available and all its functionality has been included in the Windows Photos app.
To edit and speed up your speedpaint video on Windows, follow these steps:
- Open the Windows Photos app (click here to open it)
- Import or open your recorded video file to Photos. To do that:
- Click the Video Editor tab
- Click on “New video Project”
- Click on OK.
- Add new media elements by going to the Project Library section and clicking the “+ Add” button.
- Select and add your recorded video from your PC.
- Click on “Place in storyboard” to add your recently imported video to the project storyboard.
- Now, on the Storyboard section, select your clip.
- Click on the “Speed” icon on top of the storyboard section.
- Adjust the clip speed using the speed slider that shows up under the title “Set clip speed”. Set it to the fastest setting.
- Finish your video and export it.
How to add music to your speedpaint
When recording a speedpaint, one of the things you’ll probably do is adding music and even your voice over the video.
Both programs we’ve shown can do this!
To record a voiceover on iMovie, you can head to the menu bar and click “Window”, then choose “Record Voiceover”. Or you can just press “V” on your keyboard to start recording your voiceover. Windows Movie Maker (Windows Photos) follows a very similar process.
Now that you’re editing you’ll want to add some music to your speedpaint, which is what most speedpainters do, looking to make even more engaging their creation.
But if you want to add music, you have to be cautious. Most music is protected by Copyright laws, and if you used it, they could take down your video – so you should only use songs from resources that provide copyright-free music. Some of these resources are Audio Library or Dano Songs, but if you’re looking for the best websites to get free music for your speedpaints, here we’ve compiled a list of really good speedpaint music you should definitely check out!
? How to make a speedpaint on iPad
If you’re drawing or creating your art on an iPad, or on any Android tablet for this matter, the steps above won’t necessarily apply to you, since they were more targeted at guiding you through the process of making a speedpaint on a computer. But don’t worry. We’ve got your back. Here’s what you need to do if you want to learn how to make a speedpaint on iPad or any other tablet device.
If you’re using an iPad, you can just record your screen like you’d normally do if you were to record any other app:
- Swipe up from the bottom edge of your iPad to reveal the control panel. You should see a record button (it looks like a circle within a thinner circle)
- If you don’t see any record button, go to your iPad’s Settings ▸ Control Center ▸ Customize controls and tap the switch to activate Screen Recording.
- Tap the record button. The iPad will start recording your screen after a few seconds.
- Tap the red top bar of your iPad, where the time is, to stop your screen recording.
- Get the video on your computer.
- Go to Photos and select the video you’ve just recorded. Then click on the “Share” icon on the bottom left corner of your screen (which looks like a box with an arrow) and send yourself the video (via email, or via AirDrop if you’re also using a Mac, or via Dropbox, Google Drive or any other app you use)
- Or connect your iPad using a Lightning cable to your computer and manually copy the video file
- Then speed up the video using any of the methods we’ve already covered when we explained how to edit your speedpaints and export your speedpaint video!
Also, if you’re already using the Procreate app to do your art, it already has a timelapse feature you can use to record your speedpaint!
How to make a speedpaint on Android tablets
You can also record a speedpaint on an Android tablet if that’s the device you’re using!
To do that, use the built-in Android 10 screen recorder (if you have a model that support it, like some LGs, Samsung or OnePlus do)… or if you don’t have the built-in screen recorder, download the AZ Screen Recorder free app.
The steps to record your screen on Android are very similar to those of iPad! Once you have your real-time screen recording video, connect your device to your computer using a USB cable, copy your recording and follow the already described steps to edit your speedpaints.
? How to make speedpaints more easily
All the steps above can feel a bit daunting. It’s normal: they’re a lot of steps. There’s a bunch of moving parts that you need to take into consideration and coordinate precisely to achieve the desired speedpaint. And the process can be exhausting.
We’ve been recording speedpaint-like videos for quite some years now, both professionally and in a more amateur manner, so we know exactly how painful and tedious this can feel.
That’s why we’ve created Hustl: a nice little app that does all of this automatically for you.
It really works in just a couple of clicks. Here’s a detailed tutorial, but you just need to:
- Get the app
- Select the area to record
- Click record (you can pause and resume your speedpaint anytime!)
- Click stop – and Hustl will export you a speedpaint video ready to share! Yes, it’s that simple!

Hustl directly records a speedpaint, instead of first recording a real-time video and then speeding it up: so it’s very quick and efficient. Making speedpaints was never easier! With Hustl, you could finally start creating and uploading several speedpaints a week like you’ve always wanted to.
? Conclusion
In this tutorial guide, we’ve shown you step by step how to do a speedpaint video.
First, you need to download a drawing program (like Photoshop or Clip Studio Paint). Then, you need to record your screen using a free screen recording software (like QuickTime or OBS). Finally, you have to use a free video editing software (like iMovie or Windows Movie Maker, now called Windows Photos) to speed up your video, resulting in the final speedpaint.
We’ve also covered how to record speedpaints on iPads and tablets, which share several similarities with the process to record a speedpaint on a computer.
If you were wondering how to use speedpaint or how to create your own speedpaints, we hope you’ve learned how to do it and go create some amazing pieces of art!
Leave us a comment with your speedpaint video!