If you’re looking for a tool that allows you to screen record on your iPhone, we’re glad that you’re here! In this post we will review some great apps that will give you a smooth screen record experience.
iOS Screen Recorder
The iPhone has a built-in app that allows the user to record their own screen while working, the iOS Screen Recorder.
If you’re looking to screen record from your iPhone, these are the steps to follow:
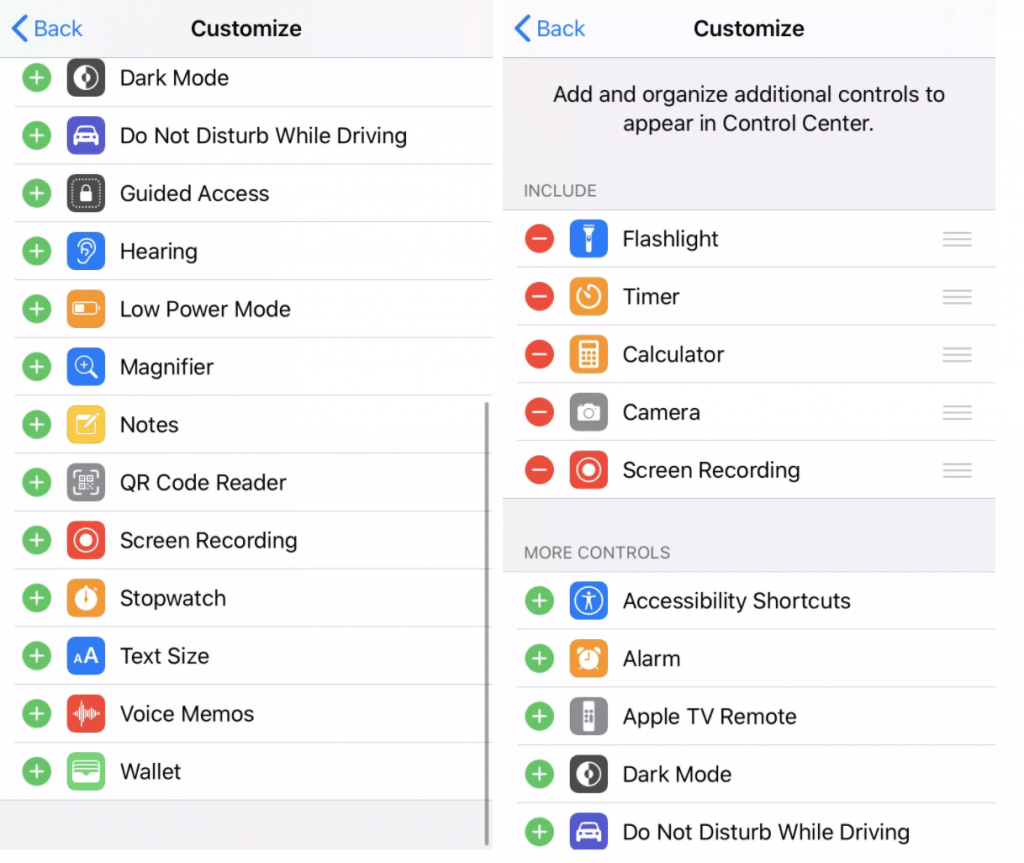
- Go to “Settings” and click “Control Center” and then “Customize control”, later press the icon “+” over the option “Screen Recording”

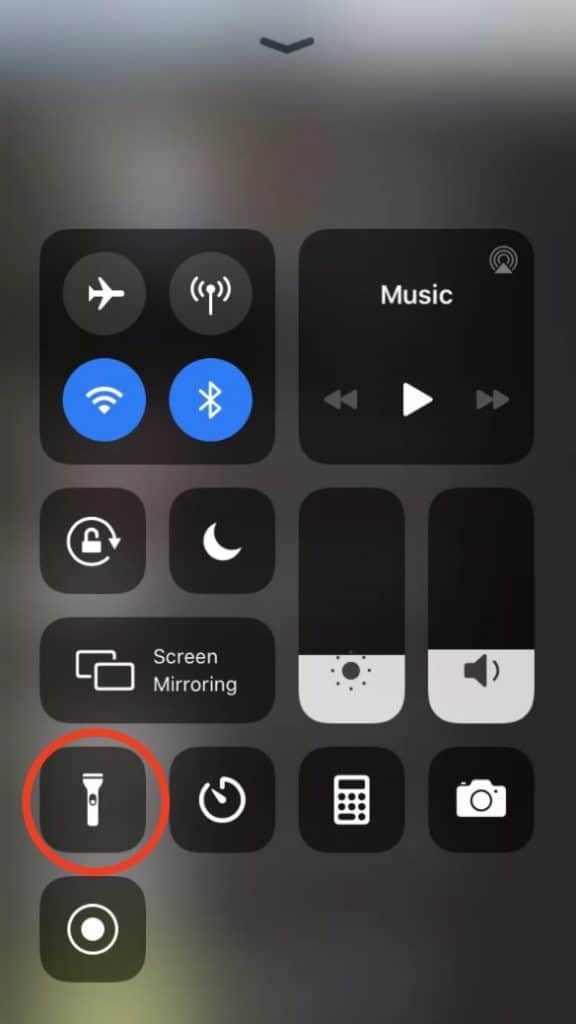
- The screen recorder option will be now included within the Control Center; to get access to it, swipe up from the bottom of the screen and then press the screen recording button (in newer devices, the control center will be accesible from the top left of the screen). It will appear a three second countdown and then the recording will start.
- Once you’re finished recording, press again the “Screen Recorder” button in the “Control Center”.

- The video will be automatically stored in the “Photos” app, from where you can easily edit or share it.
Go Record
Go Record is an app that will be a great option if you’re willing to make a fast screen record of your iOS devices.
Just hit “Record” and you will be able to add audio through your microphone and event add a reaction video of your face, that will allow you to create a tutorial format or a reaction video.
Once recorded, the app will immediately store the video in the “photos” app, so it can be edited or shared easily.
QuickTime Player
Another way to record the screen of your iPhone will be using a built-in app, QuickTime Player. For this option, you will need to have a Mac and a lightning cable. These are the steps to follow:
- First, connect your iPhone and the Mac with the lightning cable
- Open Quicktime player app, which you can easily find in the Applications folder.
- Click Folder>New Movie Recording or use the shortcut Control+Option+N

- Click over the arrow that appears besides the “Record” button and click over Camera>iPhone
- The screen will be resized and will show a mirror image of your iPhone’s screen
- Whenever you’re ready, hit “Record”
- While recording, you will see in your Mac screen everything that is happening in your iPhone; don’t worry if you see some lag between the action of the iPhone and the Mac, it’s normal.
- Once you have finish, hit the “Record” button again
- Save the video and from there, you can edit or share it
Record it
This app allows to screen record from your iPad or iPhone, being a perfect tool to record games, apps or make tutorials as it has the option of including audio and FaceCam reactions.
Check out Record it app it you’re willing to make a reaction video or fast tutorials of the screen of your iOS device.
DU Recorder
DU Recorder is both a stream and a screen recorder, that allows you to stream content through YouTube, Twitch or Facebook and screen record from your iOS device.
Once recorded, DU Recorder includes a video editor to give to your recording the final touches and later it will be stored in the photos app, from where you can share it.
Conclusion
In this post, we have presented different options to consider for you next screen iPhone video: QuickTime Player, iOS Screen Recorder, Go Record, DU Recorder and Record it, so we hope we’ve given you some ideas!
