
In this post, we will explore different ways to do a timelapse video, both from images or directly creating it from your screen, to document your work process directly from the screen. Bucle up!
Contents
Timelapse screen recorder
If you’re looking to create a timelapse from the content recorded of your screen, these are some great methods that you should definately try!
Windows
OBS + Windows Photos app
If you’re working on Windows and you want to create a cool timelapse of your screen, this is a cool (and free) option, but remember that the process is divided in two, first you must record the content from your screen and then speed the video up.
1st part: Record your screen with OBS
If you’re using Windows, you might not have a recording program out of the box as Mac users do. But don’t worry! There’s a free and easy fix for that. OBS is the acronym for Open Broadcaster Software, an app typically used by streamers (both on Twitch and YouTube) to stream their screens and webcams, but it can also record your screen without streaming.
These are the steps to follow:
- First, head over to the OBS download page and download OBS.
- Open it and install the program.
- Once you have it installed, open it. A screen similar to this one will show up:

- Add a new scene. To do that, in the lower left bottom locate the “Scenes” section and click the plus (“+”) button:

- Enter a name for your scene. It doesn’t really matter, but you can call it something like “My Screen” or “Desktop”.

- Add a source for your scene. To do that, locate the “Sources” panel right next to “Scenes” and click the add button.
- Select a Display Capture source type

- Click “Create new” and then click “Ok” to go to the source creation window.

- In the lower section, select the screen you would like to record (if you have only one screen, then only one screen will be available). Also make sure to check whether you’d like the cursor to show up in the recording or not.

- We’re now ready to start recording! Click “Start Recording” in the “Controls” panel by the right of the window and OBS will start recording your screen.
- Start creating! OBS is recording.
- When you want to finish, go back to OBS and click “Stop Recording”. The recorded movie will be saved to your “Downloads” folder.
- If you want to modify the settings of the screen recording, those can be found in the Settings window. Click the “Settings” button in the “Control” panel. On the Settings window, select “Output” on the list in the left. Then, switch to the “Recording” tab on the right side of the window. And there you can choose where your recordings will be saved, the file format and a bunch of other settings.

And you’re done! That’s how you record your screen with OBS.
2nd Part: Speed the recorded video up with Windows Photo app
In old versions of Windows, this program was called Windows Movie Maker, but since Windows 10, all its functionality has been included in the Windows Photos app and it remains completely free.
To edit and speed up your video on Windows, follow these steps:
- Open the Windows Photos app
- Import or open your recorded video file to Photos. To do that:
- Click the Video Editor tab
- Click on “New video Project”
- Click on OK.
- Add new media elements by going to the Project Library section and clicking the “+ Add” button.
- Select and add your recorded video from your PC.
- Click on “Place in storyboard” to add your recently imported video to the project storyboard.
- Now, on the Storyboard section, select your clip.
- Click on the “Speed” icon on top of the storyboard section.
- Adjust the clip speed using the speed slider that shows up under the title “Set clip speed”. Set it to the fastest setting.
- Finish your video and export it.
That’s it! Enjoy your timelapse!
Mac
QuickTime Player + iMovie
If you are looking to create a timelapse from your screen recorder with these two free tools, available in Mac, you must remember that this process has two parts, first you must record your screen and then speed the video up.
1st Part: Record your screen with QuickTime
QuickTime Player is a little program preinstalled in all Mac devices and can be used to record your screen.
These are the steps to follow to record your screen with QuickTime Player:
- Open QuickTime.To do this, the easiest way is to press the keys
⌘ command+spacebar. A little box will open in the middle of your screen, that’s called Spotlight. Write “quicktime” and an item called “QuickTime Player.app” will show up. Click it to open QuickTime.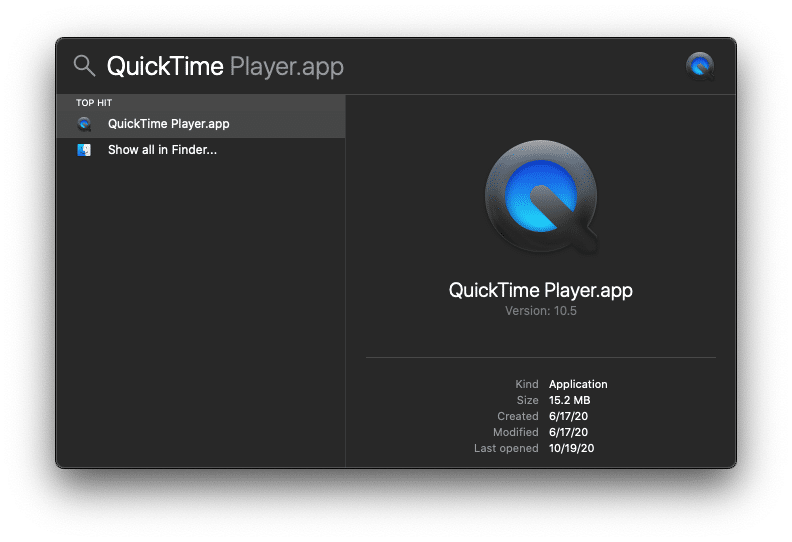
- Confirm QuickTime is opened.QuickTime will start up. You can check it by looking at the top left corner of your screen, your Menu Bar, and seeing that in fact QuickTime Player is the current open program.
- Go to File and then click “New Screen Recording”.


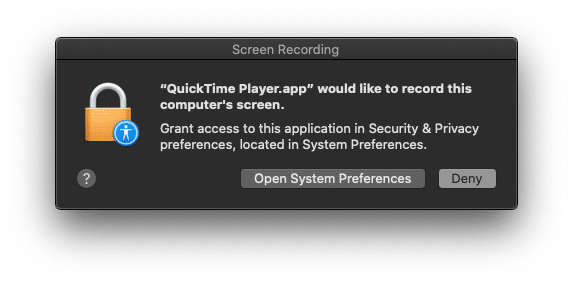
- Grant QuickTime screen recording permissions.It may happen that QuickTime will ask you for Screen Recording permissions. You should grant the app those permissions or otherwise QuickTime will be unable to record anything and most likely all recording attempts will just record just your empty desktop. Click on “Open System Preferences”, make sure “QuickTime Player” is checked in the list of apps allowed to record your screen and quit the window or follow the steps macOS tells you to. (You may need to reopen QuickTime again).
- Select the area to record.After clicking “New Screen Recording”, you will see a crop box with handles to define which portion of your screen you want to record. You can also choose to record your full screen. After you’re done selecting the part of your screen you want to record, look for the “Record” button that’s at the QuickTime control bar by the bottom of the screen and click it. QuickTime will start recording the selected portion of the screen.
- Get to work! Now is the time to do everything you want to record: code, paint… Rest assured QuickTime is recording everything you do. Also, you might be careful not to open any other apps so they don’t end up in the final timelapse!
- Stop the QuickTime recording.When you’re done, it’s time to stop the QuickTime recording. To do that, look in your Mac’s Menu bar at the very top of the screen for the QuickTime stop icon and click it
- Export the video.Once you click it, QuickTime will open up a window with the video you’ve recorded, ready for you to save. So go ahead and export it! Click File -> Save… and select where you want your video to be saved!


And we’re done recording the screen with the QuickTime app!
2nd Part: Speed the video up with iMovie
iMovie is a free app that comes preinstalled with your Mac, or that you can download very easily and for free from the Mac App Store.
These are the steps to follow to speed the video you’ve just created up:
- Download iMovie (if you haven’t already or if you don’t have it installed in your computer). Head over to the Mac App Store (click on the icon on the top leftmost corner of your screen and then click “App Store…”) and then search for “iMovie”. Click it to open the app page and just click “Download”.

- Once you have iMovie, open it. If you can’t find it in your Mac, press the keys
⌘ command+spacebar. In the Spotlight box that shows up, write “iMovie”. An item named “iMovie.app” will show up, just click it to open it.

- Click on “Create New” to create a new film project
- If you get the option to choose, choose, “Movie”

- You’ll see the iMovie main interface

- Drag and drop the video file you recorded in the previous step anywhere into the timeline:

- Right click on your clip and select “Show Speed Editor”.

- A small circular knob will appear in the upper right corner of your clip

- Click and drag the speed knob all the way down to the start of the clip to compress the clip by increasing its speed. An icon of a rabbit will appear on top of the clip, indicating the clip has been sped up.
- Once you’re happy with the final speed, export the final timelapse video by going to File ▸ Share ▸ File… and selecting the location where you’d like to save your timelapse.


And that’s it! Your timelapse is ready! Congratulations!
Hustl
Hustl is an app that creates timelapses automatically for you.
It really works in just a couple of clicks, you just need to:
- Get the app
- Select the area to record
- Click record (you can pause and resume your timelapse anytime!)
- Click stop – and Hustl will export you a timelapse video ready to share! Yes, it’s that simple!

Hustl directly records a timelapse, instead of first recording a real-time video and then speeding it up: so it’s very quick and efficient. With Hustl, you could finally start creating and uploading several timelapses a week like you’ve always wanted to!
Timelapse from images
If you’re looking to create a timelapse video from a series of photos taken in sequences, here are some great (and free) options!
Windows
Windows Photos app
If you’re using Windows, Photos app is a free tool that it’s included in all its devices. These are the steps to follow:
- Open Windows Photos app and import the sequence of photos that will be turned into a timelapse video
- To import the photos, select “Import” on the left menu. A windows will appear, get to the file where your photos are and select all of them by pressing “Ctrl + A” and hit import.
- Once imported, select on the top menu Tools>Edit and open the menu “Speed”

- The proper timelapse speed will be between 4x and 16x, try them to find the speed that suits you.
- Once you’re happy with the final video, got to the right top menu and click “Save Movie” to save it in your computer.

- Enjoy your new awesome timelapse video!
Mac
QuickTime Player
QuickTime Player is free and built-in app available in all Mac that will help you create timelapses from still images. These are the steps to follow:
- Open QuickTIme Player and click File > Open Image Sequence

- Select your sequences of photos that you want to turn into a timelapse
- A new window will pop up asking you to adjust your settings. The recommendation is to maintain the Actual Size resolution, a frame rate of 25 FPS and encode for Higher Quality (ProRes).

- The timelapse video is ready! Now click File>Save and determine where will you save your new video.
- Enjoy your new timelapse video!
iMovie
iMovie is another free and built-in app inside every Apple device so is a really good option to create a timelapse from images. These are the steps to follow:
- Open iMovie and create a new project. Remember to click on “Movie” and not “Trailer”!

- Click on the iMovie logo (in the upper left of your screen) and click “Preferences”

- It will open a new window, in the Photo Duration space include “0,1 seconds”. From now on, iMovie will understand each photo as a video of 0,1 seconds long.

- In the same window, go to “Photo Placement” and change the option to “Crop to fill”

- Press the “Import media” button and select all your series of photos by pressing Command +A and then hit “Import All”

- Press “Command + A” over your photos again and drag them into the timeline.
- The footage will be played at 10 frames per second. Normal videos often display at 25 or 30 FPS. If you see that the video is not playing smoothly click on the “Crop” logo and choose again the option “Crop to fill”

- Now the process gets a little weird. We will need to export the file, then import it again and speed the video up.
- So, now click on File > Share > File and save it in your computer.

- When saving it, set the following settings

- Now, import your saved file again into iMovie and drag it into the timeline, removing the previous material.
- So now we have to speed it up to timelapse speed, for that, click on the little speed logo button

- In the speed menu, select “Custom” and set the speed either 250% or 300%, depending if you prefer 25 or 30 FPS

- Now your timelapse video should run smoothly! To export it click again File>Share>File and save it in your computer.
- Enjoy your cool timelapse video!
If you’re looking for more pro options, check out our post Timelapse software, where you will be able to find some really suitable options to create timelapses from still images.
iPhone Timelapse
To make a time lapse video on iPhone, just open your Camera app, scroll left on the camera mode selection wheel until “Time-Lapse” is selected and start recording! The camera will now take a shot every few seconds and at the end it will stitch them all up together into a time-lapse video in your iPhone camera roll. If you’re willing to control the speed of your video, check out out tutorial How to slow down a timelapse video.
Incredibly, that’s all you need to know! If you want to learn even more and have some useful tips, check out our tutorial iPhone Timelapse. In addition, we also have a practical tool iPhone timelapse calculator, that it can really save you time from doing manual calculations about which FPS and interval you should set.

If you’re willing to record the screen area of your iPhone, check out this post Screen Recorder for iPhone.
Conclusion
In this post, we’ve shown you some great methods to start creating great timelapse videos and become a pro!
We have reviewed three different situations: Timelapse screen recorder, Timelapse from still images and iPhone Timelapse and we hope that now you find yourself skilled enough to start creating!